Feedback Form With Anvil

I am an Analytical Engineer and I share my learning progress...
Hello, we are going to build a simple feedback form with Anvil
link to the tutorial for a step-by-step guide.
Chapter 1:Build your user interface
login to Anvil and click ‘Blank App’. Choose the Material Design theme.
Name the app. Click on the name at the top of the screen and give it a name.
Step 2: Add the first components
We construct the UI by dragging and dropping components from the Toolbox into the page.
The Theme Elements part of the Toolbox contains components that are specific to the current app’s Theme. Here, you’ll find the Card component:
- Drop a Card and a Label into the page.
Step 3: Change component properties
Below the Toolbox, you’ll see the Properties Panel, where you edit the styling and behavior of your components.
Select the Label you just added to the page, and change the text to ‘Feedback Form’.
Next, change the role to Headline.
Step 4: Add field labels
Our feedback form will ask our users for their names, and email addresses, and to leave some feedback.
We’ll use Labels for our input prompts. Drop three Labels.
Name:
Email:
Feedback:
Step 5: Add input components
Drop two TextBoxes and a TextArea into the page for our user inputs, and rename them name_box , email_box, and feedback_box.
We’re changing the name of each user input component, to make it easier to identify them from the code.
Step 6: Add submit button
Finally, Drop a Button into the page. In the Properties Panel:
Change the
namefrom ‘button_1’ to ‘submit_button’Change the
textfrom ‘button_1’ to ‘Submit’Change the
roleto ‘primary-color’.
Chapter 2:Create your database
We’ll use Data Tables to store feedback from our users. Data Tables are an out-of-the-box option for data storage in Anvil, and they’re backed by PostgreSQL.
Step 1: Add a Data Table to store your feedback
In the sidebar menu on the left, click the database icon then click on ‘+ Add Table’.
Rename the table to ‘feedback’ by clicking the three dots menu next to ‘Table1’ on the left-hand side of the editor.
Step 2: Set up your table
Now set up your “feedback” table, with the following columns:
name(Text column)email(Text column)feedback(Text column)created(Date and Time column)
Here’s how to do that:
Click Add a column for the name of the person submitting feedback, by clicking ‘+ New Column’ and choosing ‘Add text column…’. Call this column ‘name’.
Keep adding columns until your Data Table has the structure we described above. Column titles are case-sensitive, so let’s stick to lowercase.
Chapter 3:Write server-side Python
Anvil’s Server Modules are a full server-side Python environment. Server Modules cannot be edited or seen by the user, so we can trust them to do what we tell them. This is why we’ll use a Server Module to write to the Data Table.
Step 1: Create a Server Module
Create a Server Module by selecting the App Browser in the Sidebar Menu and clicking ‘+ Add Server Module’.
Step 2: Store data using a server function
We’ll write a server function to add a new row to the ‘feedback’ Data Table we just created. We’ll use the [add_row method](https://anvil.works/docs/data-tables/data-tables-in-code#adding-data) to do this.
Add this function to your Server Module:

Chapter 4:Write client-side Python
We want to store information in our Data Table when users click the ‘Submit’ button. This means calling the add_feedback server function when our users click the submit_feedback Button.
We’ll use Events for this.
Step 1: Set up an event handler
Anvil components can raise events. For example, when a Button is clicked, it raises the ‘click’ event.
Click on ‘Form1’ in the App Browser to go back to your UI. Click on your ‘Submit’ Button, and scroll to the bottom of the Properties Panel. You’ll see a list of events for the Button.
Click the blue arrows next to ‘click’.
You will be taken to the Form Editor’s ‘Split’ view, where you’ll see the Code Editor. This is where you write your client-side Python code that runs in the browser.
You’ll see a submit_button_click method on your Form that looks like this:

Step 2: Run your app
To see it in action, click the ‘Run’ button at the top of the screen:
Step 3: Capture user inputs
When someone clicks Submit on our feedback form, we want to store a name, email address, and some feedback for that person in our Data Table.
We can read data from our input components by reading their properties. For example, we can read the text in our TextBoxes using their text property.
Edit your submit_button_click function to look like this:

Great! Now we’ve captured the name, email, and feedback that we want to store in our Data Table.
We want to call our add_feedback server function when the button is clicked, and pass in the user inputs. We made our add_feedback server function available to our client-side code by decorating it as @anvil.server.callable.
This means we can call it from our client-side code using anvil.server.call('add_feedback', <arguments>)
Let’s call our add_feedback server function from our submit_button_click function:

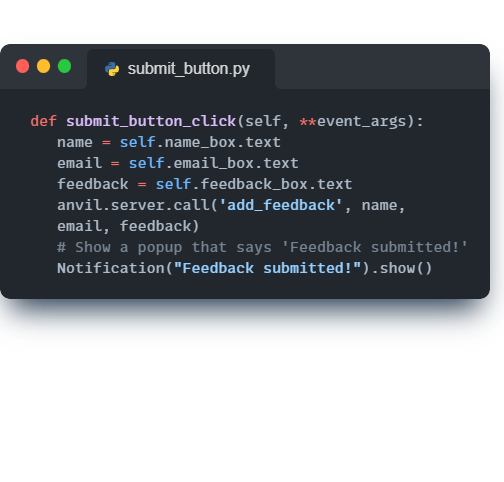
Step 4: Display a notification
We’ll also display a temporary popup using a Notification to let our users know their feedback has been submitted.
Edit your submit_button_click function to look like this:
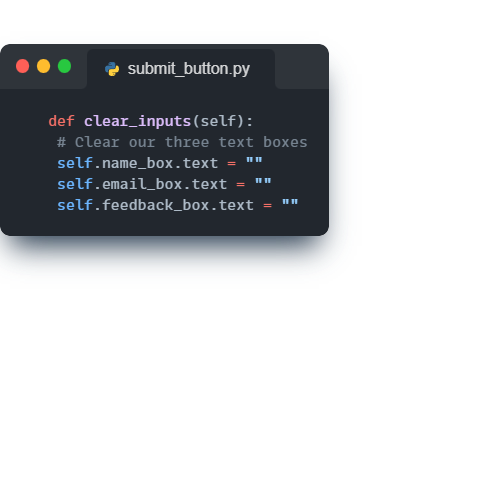
Step 5: Clear our user inputs
There’s one final step left, and that’s to clear our user inputs each time someone submits feedback.
We’ll do this in a separate function to keep our code nice and clean.
Add this method to your Form, underneath your submit_button_click() method:
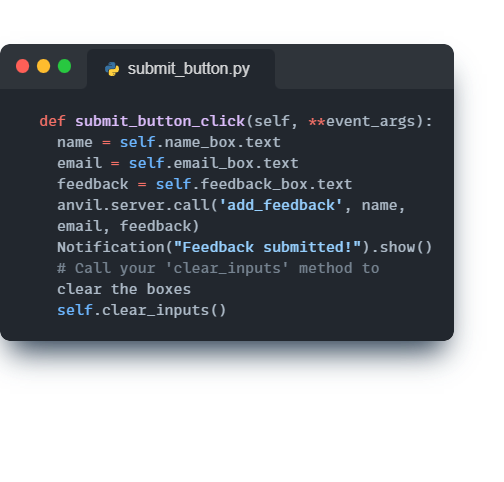
Finally, let’s call this from our submit_button_click method, so that we clear our inputs each time feedback is submitted.
Edit your submit_button_click function to look like this:
Step 6: Run your app
Time to Run your app! Click the ‘Run’ button at the top of the screen, fill in a name, email address, and some feedback and click Submit.
Then, stop your app, and go to your Data Tables. You’ll see you have a new row of feedback in your Data Table!
Here is a preview of the app I made
You can build yours and also add advanced features like a Dropdown menu
Happy Learning 🎉


